


Halloween window painting has everything I want from small-apartment decor: it uses a surface that is already there, takes up no floor space and becomes dramatically better after dark. A few cream ghosts or black bats can turn an ordinary window into the focal point of the whole room.
Renters do not need a “temporary” craft that leaves tinted grout around the frame, scratches the glass or becomes a permanent conversation with the landlord. That is why this guide starts with the removal plan rather than the picture. The designs are fun, but the test patch, protected frame and correct paint matter more.
My preferred approach is a small batch of washable tempera mixed with a little mild dish soap and only enough water to improve the brush flow. It is inexpensive, opaque and designed to release with soap and water. Still, no homemade recipe is safe for every window assembly. Use it only on tested, plain, uncoated glass and keep it away from vinyl, painted wood, tinting film, seals and porous sills.
If you want to decorate the rest of the room after finishing the glass, pair this project with my Halloween apartment decor ideas. The window should be the anchor, not one more decoration competing with twenty others.
Quick answer: Mix four teaspoons of washable tempera paint with one teaspoon of mild clear dish soap. Add up to half a teaspoon of water only if the mixture drags. Test it on a hidden corner of plain glass for 24 hours, remove the test completely and paint only if the glass and nearby finish remain unchanged.
Is Halloween window painting actually renter-friendly?
It can be, but “washable” is not the same as universally damage-free.
Plain interior glass is generally the lowest-risk surface because it is smooth and nonporous. Problems usually begin when paint touches something else: white vinyl frames, painted trim, old caulk, unfinished wood, solar film, plastic glazing or a factory coating. Strong pigments may leave color behind on those materials even when they wipe cleanly from the center of the pane.
Before opening the paint, check four things:
- Your lease or building rules. Some apartments regulate anything visible from outside, even temporary holiday decorations.
- The actual glazing. Do not assume every clear pane is bare glass. Skip windows with applied privacy film, tint, acrylic panels or an unknown surface coating.
- The paint label. Choose washable tempera from a reputable manufacturer and follow its directions. If children are participating, look for an ACMI Approved Product seal and review the Art and Creative Materials Institute’s materials-safety guidance.
- A complete test removal. Paint a one-inch patch in an inconspicuous glass corner, leave it for 24 hours, then remove it using the same method you plan to use after Halloween.
I never let the test patch touch the frame. A clean result in the middle of the pane does not prove the recipe is safe for adjacent vinyl or paint.
The $2 washable Halloween window paint recipe
This is a small-batch formula for one color:
- 4 teaspoons washable tempera paint
- 1 teaspoon mild clear dishwashing liquid
- Up to 1/2 teaspoon water, added drop by drop
Stir slowly in a reusable cup until the color is uniform. Avoid whipping air into the mixture because bubbles create pinholes and streaks. The finished texture should resemble thin craft paint: fluid enough to leave the brush, but thick enough to stay where it is placed.
The dish soap helps the dry layer release during cleanup. Water is optional and should be added sparingly.
The “$2” refers to the approximate amount of material used for a modest two- or three-color design when buying budget supplies or using paint already in a craft box. Full bottles may cost more, and prices vary. I would rather be transparent about that than pretend every store sells a complete kit for two dollars.
What not to substitute
Do not use acrylic craft paint, enamel, permanent glass paint, spray paint, house paint or paint markers unless the manufacturer specifically describes a removable glass application. Permanent products may bond to the surface and turn cleanup into scraping.
Avoid food coloring as a shortcut. Concentrated dyes can stain seals, grout, porous trim and pale plastics. Also skip abrasive additives and anything gritty enough to scratch glass.
Supplies for temporary Halloween window art
You do not need a professional sign-painting kit. Gather:
- Washable tempera paint in two to four colors
- Mild clear dish soap
- Small reusable cups or a divided palette
- Soft synthetic brushes in one medium and one narrow size
- A foam dauber or makeup sponge for solid silhouettes
- Paper towels and two microfiber cloths
- A drop cloth or old towel for the sill and floor
- Printed design templates
- Low-tack tape used only where the surface manufacturer permits it
- A cup of clean water for rinsing brushes
- A plastic card or plastic scraper for stubborn residue
Keep the palette controlled. Cream, charcoal and muted pumpkin orange photograph beautifully and remain visible in both daylight and warm evening light. Plum, faded olive and aged gold create a moodier vintage look.
For more affordable seasonal layers that do not require permanent changes, see these cozy fall apartment decor ideas.
How to paint apartment windows for Halloween
1. Choose the correct side of the window
Paint the interior-facing surface. It is protected from rain, easier to reach and simpler to remove. Do not paint exterior glass from a balcony or lean through an open window.
Keep the design outside the window’s operating hardware. Locks, tracks, handles, ventilation gaps and emergency egress must remain fully functional.
2. Clean the glass gently
Remove dust and grease using the window manufacturer’s approved cleaner. Follow with a damp microfiber cloth and dry the pane completely. Residue creates patchy adhesion; trapped grit can scratch during removal.
Do not flood the bottom seal or track. Lay an old towel across the sill before painting.
3. Protect the frame without painting it
Leave a visible border of bare glass around the entire design. One or two inches is usually enough to prevent normal brush strokes from reaching the trim.
Instead of relying on tape along delicate vinyl or painted wood, hold a piece of cardstock against the edge as a temporary shield. If you use tape, confirm it is approved for that exact finish and test it first.
4. Position the template
Attach the printed template to the opposite side of the glass so you can trace it from indoors. This keeps the paper and tape away from the wet design. Reverse any letters before printing so they read correctly from outside.
5. Apply one controlled coat
Outline the major shape with the narrow brush, then fill it with the medium brush or sponge. Work from the top downward so your hand does not drag through finished areas.
Do not repeatedly brush paint that has started drying. Let the first layer dry and add a second coat only where light still shines through unevenly.
6. Inspect the design from both sides
Step outside or view the glass from across the room. Window art often looks different from a distance. A small imperfection at arm’s length may disappear completely when the whole design is visible.
My editing rule is simple: if the window already reads clearly from the doorway, stop adding details.
10 washable Halloween window painting designs
1. A floating ghost procession
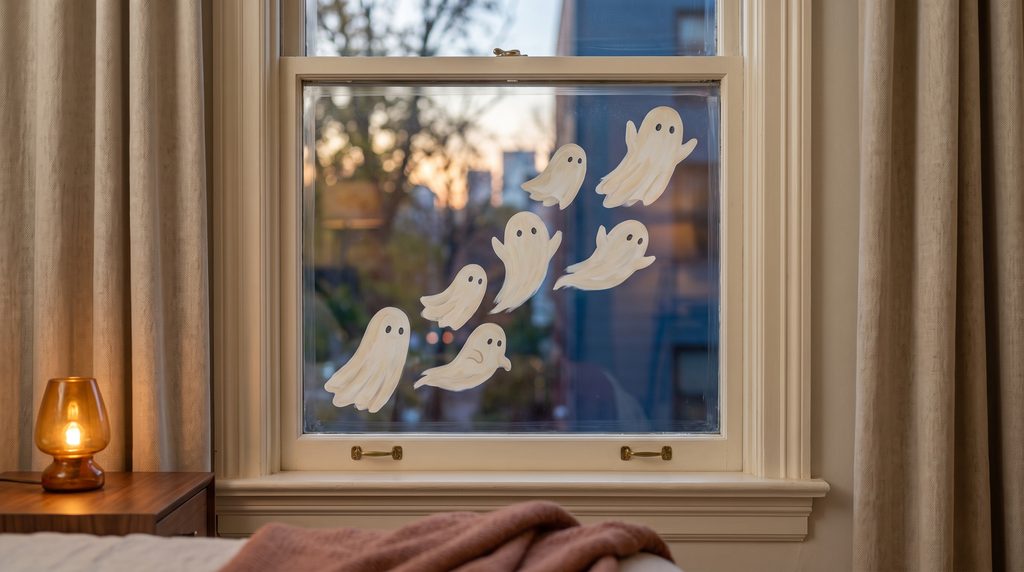
Paint three to seven cream ghosts rising diagonally from a lower corner. Change their sizes slightly and leave generous space between them. A loose procession creates movement without covering the whole pane.
Use two black dots for each face rather than detailed expressions. This is the easiest design for beginners because uneven edges make the ghosts feel softer and more animated.
Best for: Narrow windows and small apartments
Difficulty: Very easy
Pinterest hook: “The five-minute ghost window”
2. A bat swarm that changes scale
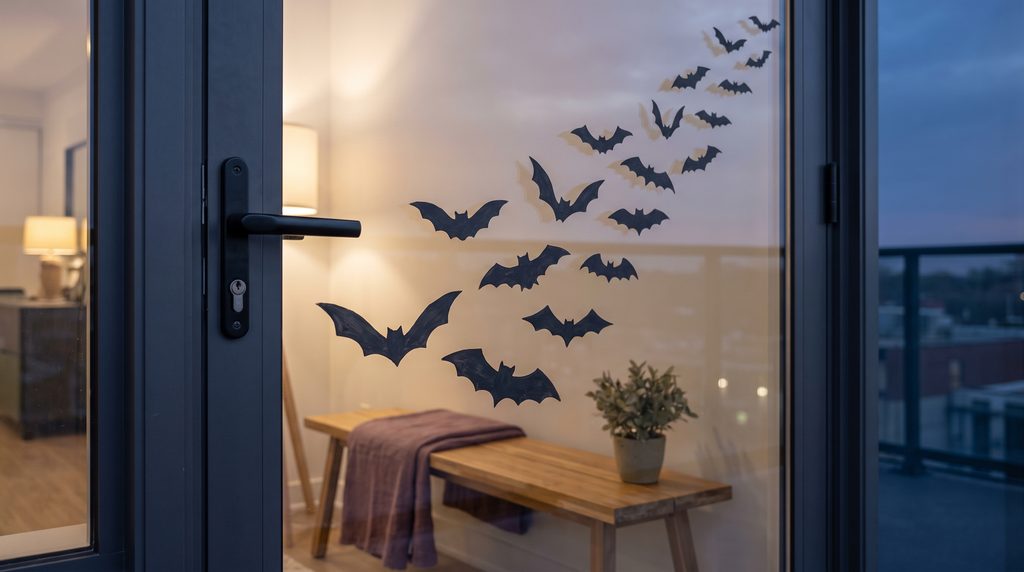
Start with two larger charcoal bats near the bottom and gradually reduce the size as the swarm moves upward. The scale shift creates depth and makes the window appear taller.
Keep each bat to a simple folded-wing silhouette. Paint twelve good shapes rather than forty tiny ones. If you already have paper bats elsewhere in the apartment, repeat the same direction so the room tells one visual story.
Best for: Tall panes and balcony doors
Difficulty: Easy
Pinterest hook: “The bat-spacing rule”
3. A crooked haunted-house skyline
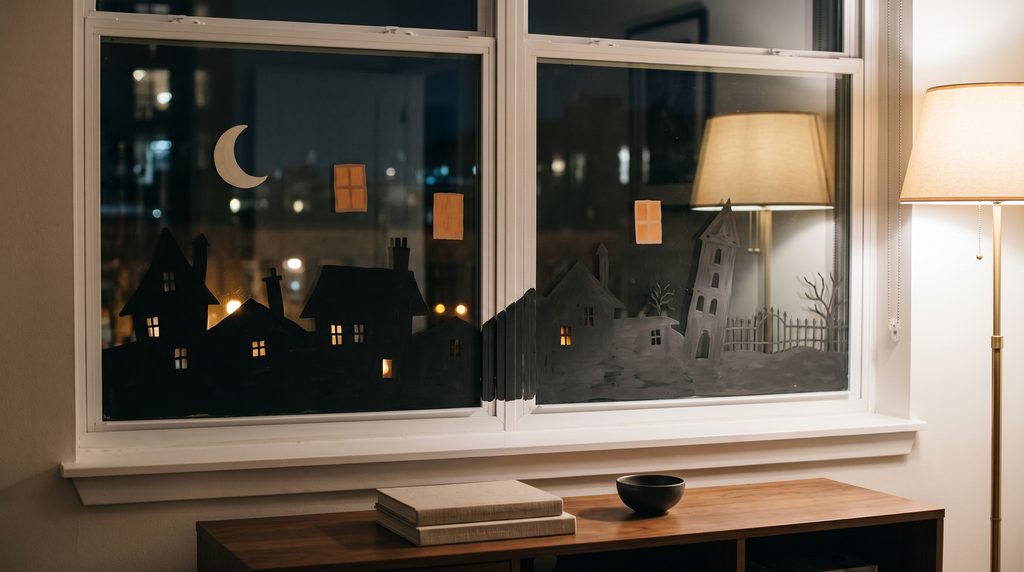
Build a dark skyline along the bottom quarter of the glass using narrow townhouses, uneven roofs and a few glowing cream windows. Leave the upper pane mostly open so daylight can still enter.
Room light makes the painted windows appear illuminated from behind. Avoid covering the entire lower pane; negative space keeps the skyline readable.
Best for: Wide living-room windows
Difficulty: Moderate
Pinterest hook: “The no-floor-space haunted village”
4. A crescent moon with three hanging stars
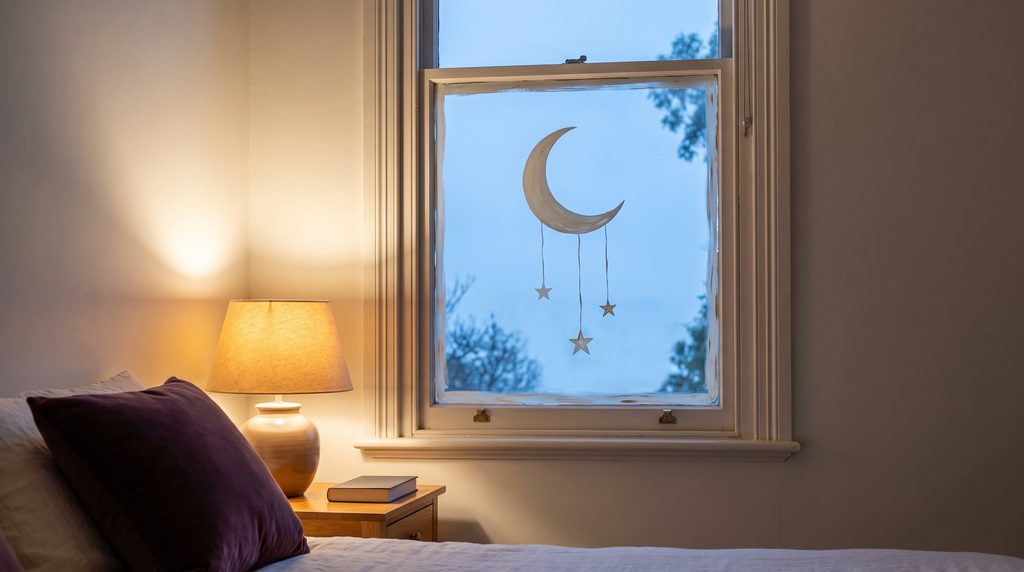
Paint one oversized cream crescent in the upper third of the pane. Add only three small stars and one thin charcoal cloud. The limited composition feels more elegant than a window crowded with separate symbols.
It can lean celestial, gothic or vintage depending on the palette.
Best for: Bedrooms and reading corners
Difficulty: Easy
Pinterest hook: “Moody Halloween window art”
5. A spiderweb confined to one corner
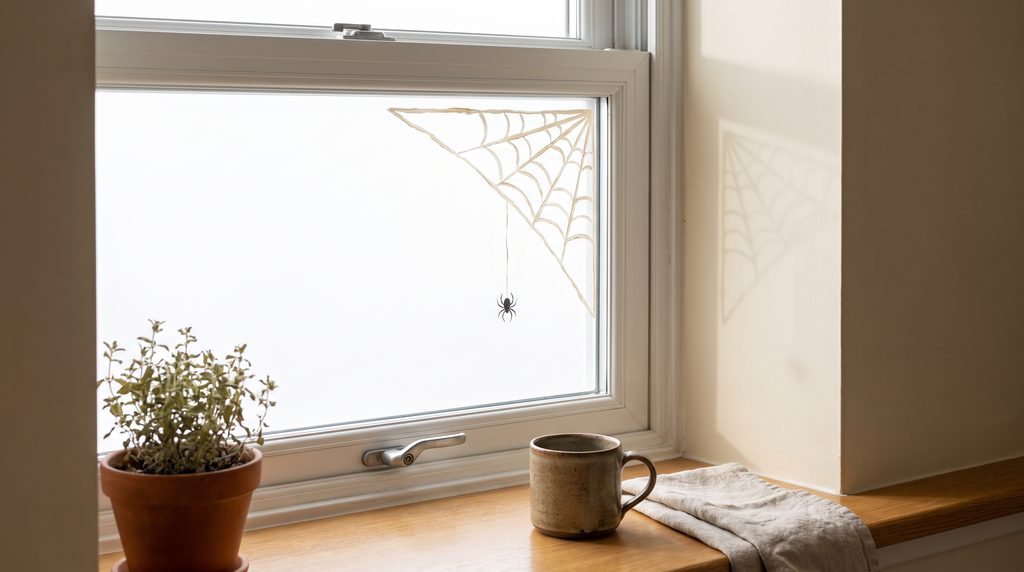
Begin with six lines radiating from an upper corner, then connect them with loose curved bridges. Add one small spider hanging from a single thread.
The key is containment. A web covering every pane can block the view and look visually heavy. One defined corner gives you the same Halloween cue while preserving light and openness.
Best for: Kitchen and bathroom windows
Difficulty: Easy
Pinterest hook: “The one-corner Halloween rule”
6. A row of expressive pumpkin faces
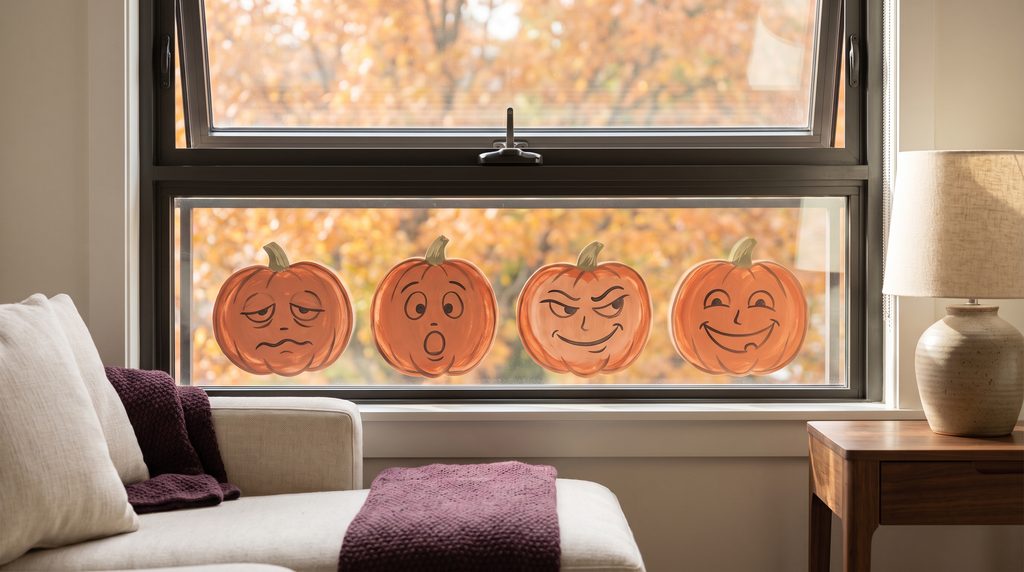
Paint four muted-orange pumpkin shapes along the bottom of the glass, then give each one a different charcoal expression. Keep the bodies simple and let the faces provide personality.
For a family project, let each person design one pumpkin. Repeated height and color will connect the different faces.
Best for: Family rooms and children’s spaces
Difficulty: Very easy
Pinterest hook: “Four pumpkins, four moods”
7. A black-cat silhouette on a painted sill line
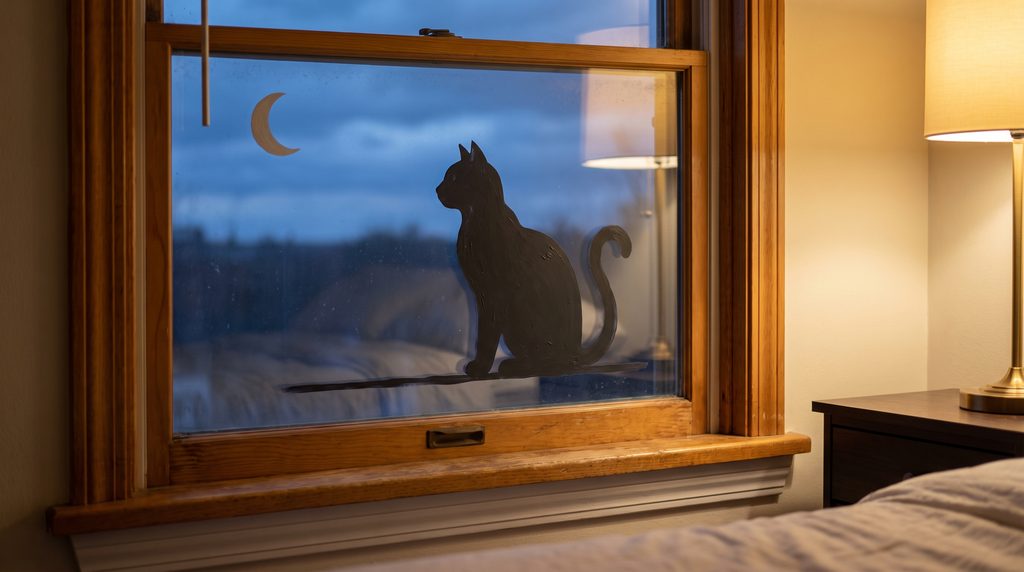
Paint one seated charcoal cat in profile, with its tail curving toward a small crescent moon. Add a thin horizontal line beneath it to suggest a ledge—but keep that painted line on the glass, not the physical sill.
The silhouette should occupy no more than one-third of the window. Its recognizable outline gives you more impact than a collection of tiny motifs.
Best for: Compact bedroom windows
Difficulty: Moderate
Pinterest hook: “The one-silhouette window”
8. A vintage apothecary border
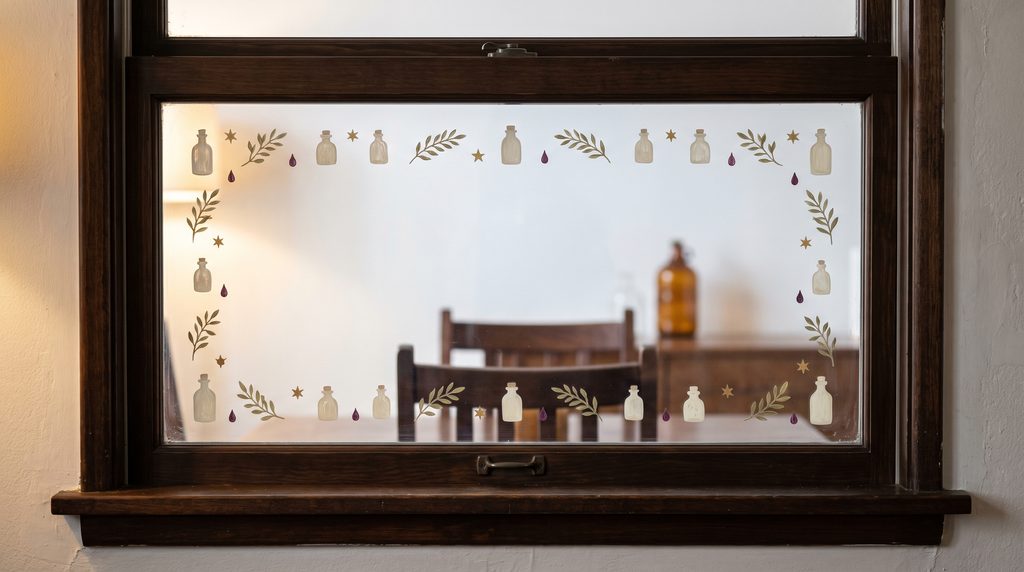
Paint small cream bottle outlines, stars and botanical sprigs around the outer glass edge while leaving the center clear. Use a muted plum accent on every third bottle to create rhythm.
Because the border sits near the frame, maintain a generous strip of bare glass so no paint touches seals or trim.
Best for: Vintage and Grandmacore-inspired Halloween decor
Difficulty: Moderate
Pinterest hook: “The vintage border that leaves the view open”
9. A geometric candy-corn pattern
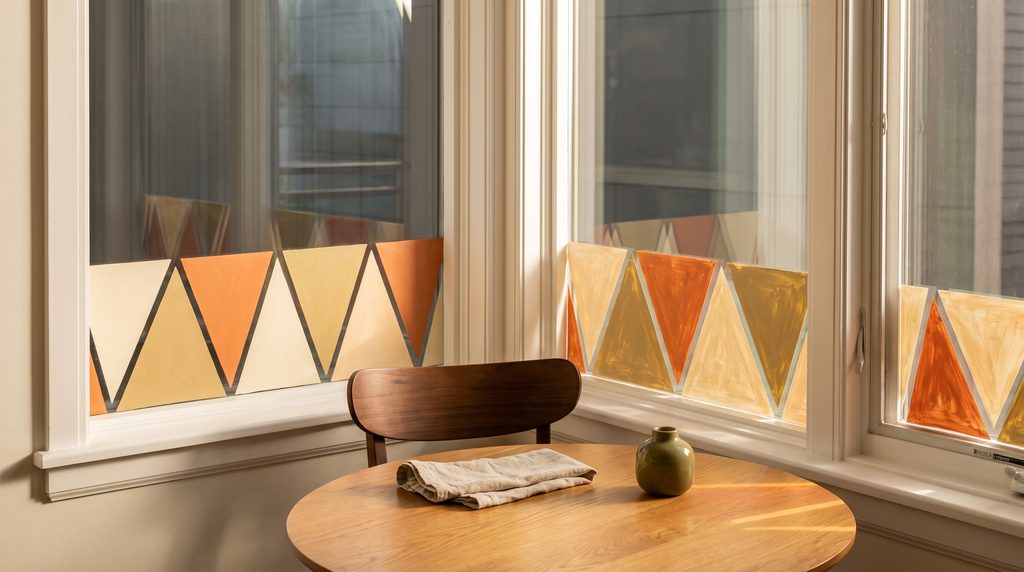
Instead of painting literal candy pieces, divide the lower section into a simple series of cream, muted orange and pale-gold triangles. Keep the lines loose and handmade rather than perfectly mechanical.
The pattern suits modern apartments where detailed character art would clash with the decor. Use only the lower fifth of the pane.
Best for: Modern kitchens and dining nooks
Difficulty: Easy
Pinterest hook: “A grown-up candy-corn window”
10. A negative-space haunted arch
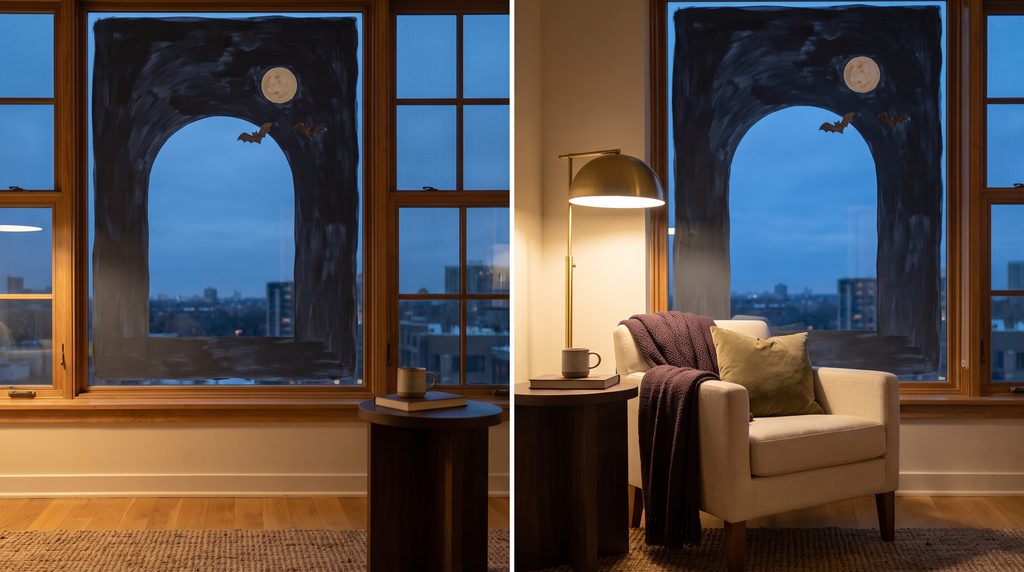
Paint a large charcoal arch but leave the center unpainted. Inside that clear opening, add only a small moon and two bats. The unpainted center becomes part of the design and keeps the window usable.
The clean outline looks especially strong when seen from outside after sunset.
Best for: One main focal window
Difficulty: Moderate
Pinterest hook: “The design that uses empty glass”
How to remove washable window paint without scratching the glass
Plan cleanup while the supplies are still on the table.
- Place a towel across the sill and floor.
- Hold a warm, soapy microfiber cloth against one painted section for 20 to 30 seconds.
- Wipe gently instead of dry-scrubbing.
- Repeat the soak on stubborn areas.
- Use a plastic card at a shallow angle only if the glass manufacturer permits it.
- Wipe the pane with clean water, then dry it with a fresh microfiber cloth.
- Inspect the frame and track immediately for drips.
Crayola’s guidance for washable paint sticks on glass recommends using liquid dish soap and water, wiping, rinsing and repeating as needed—and explicitly notes that results can vary, which is another reason the patch test matters. See the manufacturer’s glass and mirror cleanup instructions.
Do not use a metal razor on tempered, coated or unknown glass. Avoid abrasive pads, scouring powders and strong solvents. If normal warm soapy water does not release the test patch, stop and contact the paint or window manufacturer rather than escalating to a harsher cleaner.
Five mistakes that make temporary window art risky
Painting directly against vinyl or painted frames
Pigment that wipes off glass may discolor adjacent material. Preserve a bare-glass border and use a handheld shield.
Skipping the 24-hour test
Immediate removal proves very little. The test should experience a full drying cycle before you decide whether to paint the rest of the window.
Using too much dish soap
Extra soap does not automatically mean easier cleanup. It can weaken coverage, create bubbles and cause drips. Keep the mixture paint-dominant.
Covering the entire pane
Full coverage consumes more paint, reduces daylight and takes longer to remove. A clear focal design is better for both aesthetics and cleanup.
Waiting until move-out day
Remove seasonal paint soon after Halloween. Do not leave a homemade mixture baking in direct sun for months and expect the same cleanup result.
If protecting your deposit is the larger goal, my renter-friendly decorating guide covers removable products, testing and move-out planning throughout the apartment.
How to make Halloween window art look good from the street
Daytime designs need strong silhouettes and contrast. Evening designs need indoor light behind them.
Place a warm table or floor lamp several feet from the window rather than pressing a hot light source against curtains or glass. Keep fabrics and paper decorations away from bulbs, heaters and candles. For seasonal fire-safety basics, review the National Fire Protection Association’s Halloween guidance.
For the strongest pin, reveal three design ingredients—silhouette, spacing and backlighting—then blur the cleanup test or recipe ratio. That keeps the image useful while giving readers a real reason to visit the article.
Frequently asked questions
What paint can I use on windows for Halloween?
Use a washable tempera product whose manufacturer permits cleanup from smooth glass, then add a small amount of mild dish soap if your test confirms that the mixture removes cleanly. Do not substitute permanent glass paint, acrylic, enamel or markers intended to cure.
Will washable tempera paint stain a window frame?
It can stain or affect some vinyl, painted, porous or weathered surfaces. Keep the recipe on tested, plain glass and leave a bare border around the frame. Protect the sill from drips and clean any accidental contact immediately according to the frame manufacturer’s instructions.
Can I use the recipe on tinted windows or privacy film?
No homemade mixture should be assumed safe for tint, applied film, acrylic glazing or specialty coatings. Skip those surfaces unless their manufacturer explicitly approves the paint and cleanup method.
How long should Halloween window paint stay up?
Treat it as short-term seasonal decor. A few days to several weeks is more sensible than leaving it through winter. Direct sunlight and long exposure can change how a mixture releases, so test and remove it well before a rental inspection.
Can children help with Halloween window painting?
Yes, with adult supervision, a protected floor and an age-appropriate washable product used exactly as labeled. Look for the ACMI AP seal when selecting children’s art materials. Keep paint out of mouths and eyes, and do not treat ordinary craft paint as face or body paint.
How do I stop washable window paint from looking streaky?
Clean and dry the glass, keep the mixture paint-dominant and apply one confident coat. Let it dry before adding coverage. Repeatedly brushing half-dry tempera usually creates more streaks, not fewer.
Final thoughts
The smartest Halloween window painting does not begin with the stencil. It begins with the test patch.
Once I know the paint releases from the glass and the frame is protected, the creative part becomes wonderfully simple. One ghost procession, bat swarm or negative-space arch can carry an entire small room because the design works in daylight and becomes a silhouette after dark.
Choose one window, two or three colors and one recognizable motif. Leave plenty of glass visible. Then store the template with your seasonal decorations so the design is easier to repeat next year.
For a complete apartment plan, continue with these 20 budget-friendly Halloween apartment decor ideas. Use the painted window as the main focal point, repeat one color in a pillow or tabletop vignette and let the rest of the rental breathe.
The result should feel festive for October—and completely normal again after one bucket of warm, soapy water.
You May Also Like

Whimsical Christmas Decor fo ...
05 November 2026
Small Kitchen Christmas Deco ...
02 November 2026

Christmas Table Setting Idea ...
01 November 2026
Popular Post


Leave a Comment